Chinese Inspired Baked Potato Wedges

Potato might just be my favorite starch. I can totally eat it for dinner everyday because it can be cooked in so many different ways! What sparked me to make these Chinese Inspired Baked Potato Wedges was simply an instagram photo of some potato wedges someone took. That picture lit my fire, and I was on a mission to bring you some potato wedges baked with Chinese bacon, muenster cheese, and scallion!

On a side note, you know where I first tried oven-baked potatoes? WENDY'S. I remember when I was a kid, my dad would bring me to Wendy's once in a while, and I'd get the cheese and broccoli baked potato (if I wasn't already tired of their waffle fires with cheese sauce!) Wait. For those of you who grew up in America. Did the Wendy's here ever served waffle fries? Well, I loved them so freaking much, I still remember paying the person behind the counter at Wendy's $16 HK dollars for an order of waffle fries.
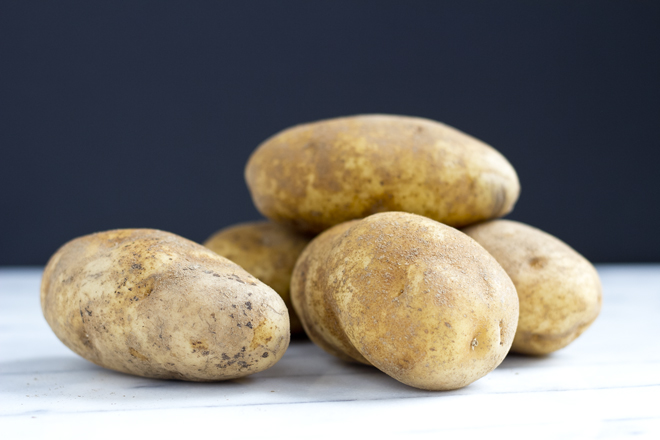
Potatoes rule!

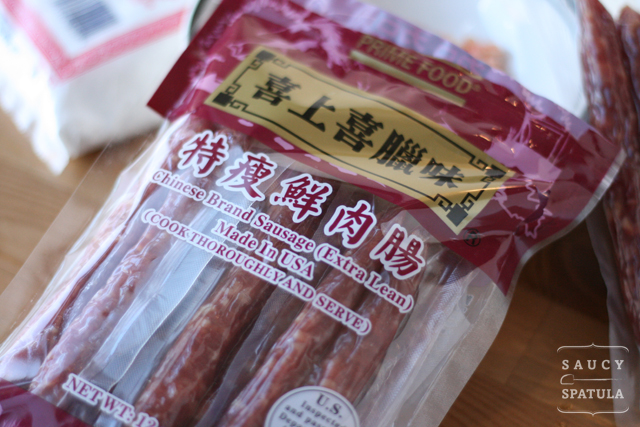
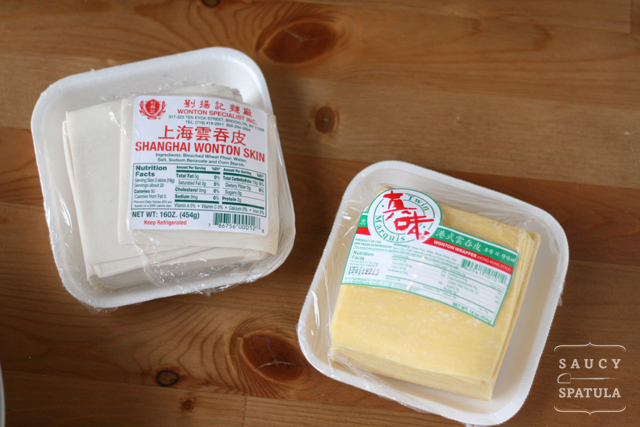
These are Chinese bacon, or lap yuk 臘肉 in Cantonese. You can find them in most Asian/Chinese supermarkets. They're mostly air-cured with soy sauce and spices. I bought some that came in vacuum sealed packages. Sometimes you can spot them being hung unpackaged next to the Chinese sausages at the store. In many recipes or packaging, it would call for soaking the bacon for a few hours before cooking. However, for this Chinese Inspired Baked Potato Wedges recipe, I decided to skip the soaking step because I didn't think it was necessary since it'd need to be crisped in the oven anyway.

And why muenster cheese? Because why the heck not!? Try it next time when you make a grilled cheese. You won't be disappointed!

Potato wedges all lined up, ready to be baked!

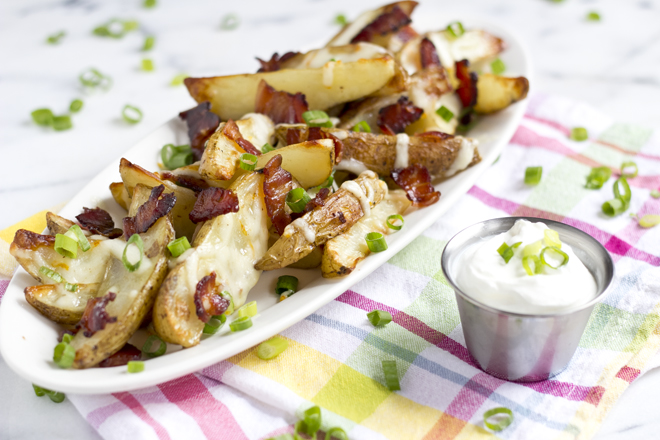
Toss them with Chinese bacon, muenster cheese, and scallion. Then load it all up on an oven-proofed serving plate, and pop the whole thing in the oven for an additional 5 minutes until the cheese has melted.

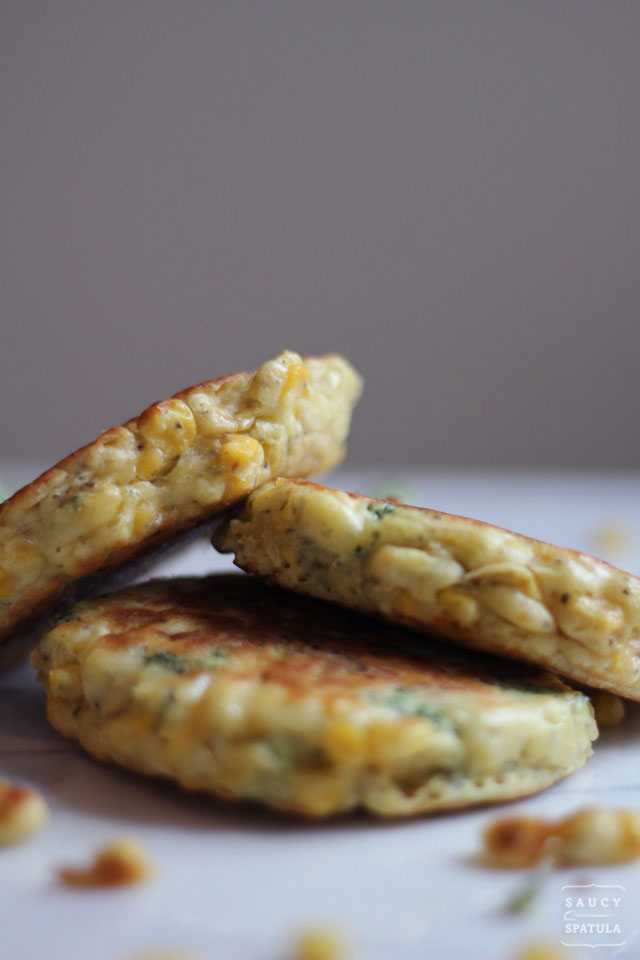
VOILÀ! There you have it! Dunk them in a side of sour cream for some satisfying bites!

Chinese Inspired Baked Potato Wedges

You'll need:

  • 3 medium Idaho potatoes, scrubbed
  • 2 deli slices of muenster cheese
  • ¼ cup sliced Chinese bacon
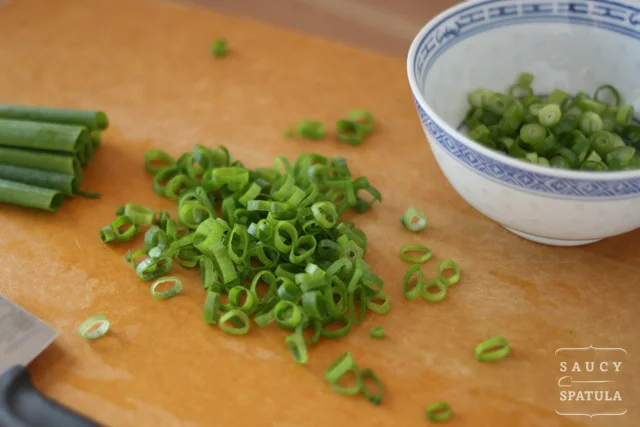
  • ¼ cup chopped scallion (about 2 stalks)
  • 2 tsp garlic powder
  • 2 tsp salt, divided
  • ½ tsp black pepper
  • some extra virgin olive oil

Approach:

  1. Preheat oven to 425°F.
  2. Line a 9"x13" baking sheet with tinfoil, coat the lined pan with 1 tablespoon of extra virgin with olive oil.
  3. Julienne the muenster cheese into very fine strips. Then slice the Chinese bacon, and chop the scallion. Set all aside.
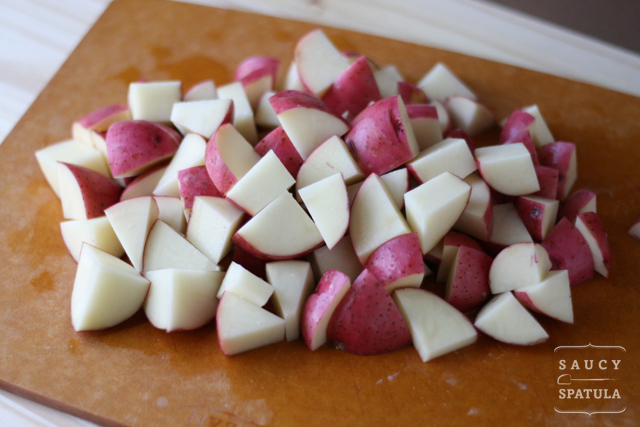
  4. Cut each potato in half lengthwise, then cut each half into 4 wedges that are about the same size. You'll have a total of 8 long wedges from each potato.
  5. Place the potato wedges in a medium mixing bowl, add 2 tablespoons of extra virgin with olive oil, 2 teaspoons of garlic powder, 1 teaspoon of salt, ½ teaspoon of black pepper. Toss it all together until potato wedges are coated.
  6. Line them up on the baking sheet with skin side down. Bake for 10 minutes. Then bake each cut side for 15 minutes, until golden brown.
  7. In a large mixing bowl, toss the potato wedges, Chinese bacon, muenster cheese, and scallion together with 1 tsp of salt. Then load it all up on an oven-proofed serving plate. Pop the whole thing in the oven for an additional 5 minutes until the cheese has melted.
  8. Serve hot with a side of sour cream.

Ginger Sriracha Chicken Wings (薑汁雞翼)

When I was younger and still living in Hong Kong, my whole family would get together about once a month at my house to have something called a dai sik wui which is pretty much like a potluck turned giant feast. It's always someone's birthday or graduation, an aunt or uncle returning from the UK for vacation or just because it's summer and everyone is itchy for summery food and playing mahjong indoors with the air con blasting. Amongst all the goodies on the table, sometimes I'd spot a dish of Coca-Cola chicken wings. Yes. That's chicken wings cooked with Coca-Cola.

For the longest time, I thought only Cantonese and people from Hong Kong would make this odd-sounding dish. Then after some browsing around, I learned that Coca-Cola chicken wings are actually quite common in mainland China, as well as other Asian counties where Coke is the king of all soda pop.

In the process of coming up with a recipe that reminds me of my family's potluck, I thought I'd do something different here. So instead of using Coca-Cola, I turned to my favorite kind of ginger ale by Bruce Cost (the jasmine flavor is incredible by the way), and made some ginger sriracha chicken wings with a mass of minced ginger, ginger ale, sriracha, and a touch of ginger juice by The Ginger People!

The best part about these wings? They are cooked in the oven rather than braised like you would for the typical Coca-Cola wings. The dry heat from the oven does it's magic to make them less fatty, and it just produces "snackier" wings without the guilt of frying!

Once they've cooked 'til golden brown, garnish with sesame seeds and chopped scallion.

Got a grill? You know what to do!

Ginger Sriracha Chicken Wings (薑汁雞翼)

Prep time: 8 hours 10 mins  Cook time: 40 mins  Total time: 8 hours 50 mins

You'll need:

  • 2 lbs chicken wings (mid sections if preferred)
  • 4 tbsp finely chopped fresh ginger
  • 2 tbsp ginger juice by The Ginger People
  • 1 tbsp sriracha
  • 2 tsp salt
  • ½ tsp sesame oil
  • ¼ tsp garlic powder
  • ¼ white pepper powder
  • 6oz (half bottle) original ginger ale by Bruce Cost
  • Garnish:
  • 2 stalks scallions, chopped
  • 1 tbsp Sesame seeds

Approach:

  1. Peel, then chop fresh ginger finely using a food processor. Remove ginger and place it in a medium mixing bowl. Add ginger juice, sriracha, salt, sesame oil, garlic powder, white pepper powder, and mix well. Then stir in ginger ale. Add chicken wings to the mix and give it a stir. Cover with plastic wrap and let it marinate in the fridge overnight.
  2. Preheat oven to 425°F. Line a half sheet pan with tin foil, then place a cooling rack on top, brush with butter or canola oil lightly.
  3. Place chicken wings on the rack and make sure they don't overlap.
  4. Bake each side of the wings at 425°F for 15 minutes (total of 30 mins). Then adjust the temperature to 475°F, and bake for an additional 10 minutes, until golden brown.
  5. Let the wings rest for 5 minutes, then garnish with sesame seeds and chopped scallion.

Notes:

Ginger juice by The Ginger People
Original ginger ale by Bruce Cost
Classic Nonstick Jellyroll Pans and Cooling Grid, Set of 3, by Sur La Table®

Meatballs with Sweet Plum Sauce (蘇梅牛肉丸)

Happy (almost) birthday, America! You're turning 238 this year! Hope you guys are looking forward to the July 4th with amazing cookouts, good company, spectacular fireworks, and let's not forget the most important of all - celebration of freedom and democracy. While America might not paint a perfect picture for everyone, we, as residents of this great nation, are truly fortunate to be living freely and enjoying the beauty of democracy.

Every year around the fourth of July, I get a little sad which has nothing to do with America's birthday. And nobody should be crying at a birthday party filled with food and entertainment (unless you're scared of clowns). But on the same week as America celebrates its independence, my birth place of Hong Kong is fighting for its own democracy on the other side of the world. This year, 510,000 Hong Kong citizens showed up on the annual July 1st march to demonstrate their desire for full democracy, and showed their support for a true election in 2017 that the Chinese central government had promised when the city was returned from the hands of Great Britain. Can you imagine if 510,000 people took the streets of New York City? Look, I love Hong Kong and it'd forever be my home where my roots are. I believe Hong Kong is a very special place like no others. It's just a little unbearable to see it being threatened increasingly by the Chinese central government whose a true bully on this playing field.

Well, until Hong Kong has reached full democracy, I will always have a little tear in my heart during Fourth of July. You may say I'm a dreamer. But I'm not the only one.

My feet, however, are standing on the soil of The United States of America. Therefore, I need to focus on what's also important to me - celebrating America's birthday! (YAY!) In this case, I brought meatballs to the party, y'all! While these are cooked on the stovetop, I highly recommend that you throw them over the grill at your Fourth of July cookout!

I love these bamboo skewers from Crate & Barrel - they're the best skewers! I got them from a Crate & Barrel outlet store in Chicago a while ago so they might not carry them anymore :( Shame!

Did you know that oyster sauce is great for seasoning beef? When I was trying to think of ingredients for these meatballs, I wanted something that's very flavorful, something more than just soy sauce. Oyster sauce seemed to be a great fit so I went testing my theory.

Not gonna lie. My first batch was way salty. I had forgotten the richness of oyster sauce, and went a little too heavy-handed. After adjusting the amount of it, the meatballs were golden, and ready to party! Meat is always good when it's got some char on it and these meatballs did not disappoint being cooked on the cast iron pan and not the grill. The hints of garlic and ginger came through, and the sweetness of the plum sauce was perfecto to go along with the savory beef.

Serve these meatballs with sweet plum sauce over rice, with buns, or even as lettuce wraps!

Have a spectacular Fourth, everyone!

MEATBALLS WITH SWEET PLUM SAUCE (蘇梅牛肉丸)

Prep time: 2 hrs 10 mins  Cook time: 15 mins  Total time: 2 hrs 25 mins

Serves: about 24, 1" meatballs

You'll need:

  • 1 lb ground beef, 80% lean
  • 2 tbsp garlic, minced
  • 2 tbsp ginger, minced
  • 2 tbsp scallion, finely chopped
  • ¾ tbsp oyster sauce
  • 1 tsp Worcestershire sauce
  • 1 cup panko breadcrumbs

Sauce:

  •  4 tbsp Chinese plum sauce
  • 2 tbsp warm water

Approach:

  1. Mix together ground beef, garlic, ginger, scallion, oyster sauce, and worcestershire sauce in a mixing bowl. Refrigerate, and let it marinate for 2 hours or up to overnight.
  2. Remove beef mixture from the fridge, and let it return to room temperature, about 10 minutes.
  3. While waiting, stir plum sauce together with water. Set aside.
  4. Mix panko breadcrumbs with the meat until well-combined.
  5. Heat a cast iron pan on medium-low, and add 2 tbsp of olive oil. Give the pan a twirl to spread the oil on the pan.
  6. Roll one-inch meatballs, and place them on the cast iron pan. Sear them for about 2 minutes, or until golden brown all around. Cook in batches if needed, and add more oil when needed.
  7. When all the meatballs are seared, put them on the skewers. Continue to cook on the cast iron on low heat for an additional 10-12 minutes. Rotate occasionally, and check the center temperature as you go.
  8. Let them cool for 1 minute, then top with sweet plum sauce.
  9. Serve immediately over rice, on a bun, or as lettuce wraps!

Black Pepper Beef Sliders

Here we go with the Cantonese-inspired sliders series #2! What did you think of the sweet and sour chicken sliders I posted a couple days ago? If you're reading this, I take it that you're interested to find out this next one I have for you as part of the sliders series? In that case, I'm seriously thrilled that you're here! And if you just happened to stumble upon this post, I'm glad that you're here too!

Do you rememeber a while ago I shared with you a recipe for Hong Kong style black pepper sauce? Well, today we're putting that to use. Black pepper sauce is quite common on the menu at tea restaurants and western-style restautants in Hong Kong. It's a sauce that usually goes along with grilled chicken or steak/beef, often served on a bed of white rice or spaghetti. I obviously grew up loving the dish so how could I not put that to use when I'm crafting some Cantonese-inspired sliders!?

And no, neither there is spaghetti in these sliders nor the buns were made out of rice. I'm not that crazy (but maybe I should be)? You be the judge, and let me know in the comments below! Beside black pepper sauce, Hong Kongers are quite fond of beef brisket which is what I used for these sliders. Even on a hot summer day, locals enjoy their beef brisket noodle soup 牛腩麵 (sometimes with a side of wontons) while taking shelter from the scorching hot weather with blasting air-con indoors. Beef brisket is also commonly enjoyed with curry (Curry Beef Brisket 咖喱牛腩) or with choy sum (菜遠牛腩).

When I thought of making beef sliders, brisket just came to my mind like second nature since it's my favorite cut of beef. I think matching it with black pepper sauce and some homemade pickles was a wise choice, and the flavors came out just right!

So kick back, and enjoy a beer with these Black Pepper Beef Sliders!

Don't forget to check out Part 1 of the Cantonese-inspired sliders series:
 Sweet and Sour Chicken Sliders

Black Pepper Beef Sliders

Prep time: 5 hours 10 mins  Cook time: 30 mins  Total time: 5 hours 40 mins

Serves: 6

You'll need:

  • 6 Martin’s “sliced potato rolls”
  • 1 lb beef brisket
  • some homemade pickles
  • Marinate:
  • 1 tbsp olive oil
  • 1 tbsp garlic, minced
  • 3/4 cup yellow onion, finely chopped
  • 1 tbsp shaoxing (紹興) rice wine
  • 3 tbsp ketchup
  • 1/2 tbsp Worcestershire sauce
  • 1/4 cup soy sauce
  • 1/4 cup water
  • 1/2 tbsp freshly ground black pepper
  • 1 tsp sugar

Approach:

  1. Cut beef brisket into 2″ strips, then arrange them in a baking dish or toss them in a large ziplock bag.
  2. Combine marinate ingredients.
  3. Pour 2/3 of it into the baking dish or ziplock bag with the brisket, and give it a quick stir. Refrigerate for 5-6 hours, and give it another stir mid-way through.
  4. minutes before you’re ready to cook the brisket, remove it from the fridge, and let it sit and return to room temperature.
  5. Using a sauté pan on medium-high heat, cook the brisket for 10 minutes with all of its marinate. Then, cover with lid and simmer for another 20 minutes. Taste test the tenderness of the meat from time to time. In my experience, the longer you cook a brisket, the more tender it gets.
  6. Remove brisket from the pan, leaving the sauce. Let the meat rest for a few minutes on the cutting board before slicing.
  7. Pour the rest (1/3) of the marinate into the pan, let it simmer until the onion has soften and the sauce has thickened.
  8. Toast 6 buns in the toaster oven (butter lightly if you like).
  9. To assemble, take slices of brisket, top with sauce and then some pickles.
  10. Serve immediately (like now!)

Sweet and Sour Chicken Sliders

Helloooo summer! What have you done so far to celebrate the return of summer? Have you jumped into the water yet? Gone on any road trips? Had any picnics at the park with friends? Speaking of picnics, I've got an idea for you the next time you're needing to make something to bring to a picnic. For the next couple weeks, I'll be rolling out four Cantonese-inspired sliders recipes. I'm taking inspiration from some classic Cantonese dishes and turning them into a bao form! Are you ready to find out more about the first one in the series?

If you liked my sweet and sour pork (咕嚕肉) last time, you'll love these sweet and sour chicken sliders even more! Why? Because it‘s made with fried chicken wings! Yes... you heard it correctly. There's something so satisfying about fried chicken wings. Agree? It's the super crispy and crunchy skin that keeps winning every single time. I used my go-to fried chicken recipe (heavily adapted from Kenji's), and was again blown away by the result. Thank you Kenji! After frying the wings, I let them cool down for a few minutes before deboning them. Give them a rough chop on the cutting board and now they're almost ready to go on the bun.

To complete the full sweet and sour chicken experience, how can we forget the pineapple, bell peppers, and homemade sweet and sour sauce?

Voilà.

Take a bite of this classic Cantonese dish with a twist. And don't forget to come back later this week for the Cantonese-inspired sliders series no.2!

Sweet and Sour Chicken Sliders

Prep time: 15 mins  Cook time: 40 mins  Total time: 55 mins

Serves: 6

You'll need:

Approach:

  1. Slice pineapple and bell peppers. Make sweet and sour sauce. Set aside.
  2. Fry chicken wings by following the direction on my fried chicken recipe. After frying, let chicken cool down for a few minutes then debone and chop up roughly.
  3. Toast 6 buns in the toaster oven (butter lightly if you like).
  4. Toss the chopped up fried chicken along with sliced bell peppers in a medium mixing bowl. Drizzle with sweet and sour sauce, and combine well.
  5. To assemble, lay pineapple ring on each bun, and top with sweet and sour fried chicken.
  6. Serve immediately.

Kenji's Crispy Crunchy Fried Chicken

I know you love fried chicken. You know you love fried chicken. Deep frying anything at home can be a pain in the butt, and handling boiling hot oil can be intimidating. So if you are ever going for the task of frying up some chicken at home, might as well do it the right way to make sure what ends up on your plate will be truly rewarding – crispy and crunchy on the outside and juicy on the inside! And here's how you do it. I do have to say, Kenji from Serious Eats really taught me everything about deep frying chicken which involves a lot of science that I was sucked into reading. I appreciate so much of how far he had gotten in finding out the best way to fry chicken, and sharing the knowledge with the world. Therefore, 95% of the credit of the recipe goes to Kenji (I just heavily adapted it to my liking). What his recipe produces is a thin crackling skin that's super crispy. With that being the goal, here are the steps to follow:

1) Pre-treat the chicken. Why? Because fatty chicken skin simply will not stick to the batter. But what do you treat it with exactly? WRITE THIS DOWN. Corn starch + salt + baking powder. After coating all the pieces, you let them air-dry for about 20 minutes.

2. Mix some batter just before you're ready to fry. If you've deep-fried things before, you know the batter requires flour. That's true. But it also requires corn starch. Too much flour will create too much gluten, and too much gluten means "tough or leathery crusts". On the other hand, too much corn starch will make a powdery coating, and creates little browning. Therefore, a 50/50 mix is what you're looking for. Now, we're not done just yet. To make a lighter, crispier, and crunchier coating, you need to add baking powder which will help with the browning as well. But don't go crazy on it, just a touch is needed.

3. The secret weapon. VODKA. What it does is pure magic (okay, maybe not quite magic since it's science that can be proofed). Alcohol limits gluten development while the battered chicken is swimming in hot oil. Secondly, by adding vodka, you're creating a "drier" batter which will aid with evaporation and dehydration tremendously when frying, resulting in a bubbly surface and a crunchier texture of the chicken.

Regular batter mixed purely with water forms gluten as it sits. This batter mixed with vodka limits gluten development so it's got a longer shelf life, which means you don't need to keep an eye on it every minute.

So there you have it. Perfect bubbly, crispy, crunchy fried chicken.

Thank you, Kenji!

Kenji's Crispy Crunchy Fried Chicken

Prep time: 35 mins  Cook time: 30 mins  Total time: 1 hour 5 mins

Serves: 20 wings

You'll need:

  • 5-6 cups canola oil (or peanut oil)
  • Pre-treatment:
  • 1 tsp salt
  • ¼ cup corn starch
  • ½ tsp baking powder
  • 2 lbs chicken wings, about 20 mid-section wings
  • Batter:
  • ½ cups corn starch
  • ½ cup all-purpose flour
  • ½ teaspoon baking powder
  • 1 tsp salt
  • ½ cup cold water
  • ½ cup vodka

Approach:

  1. Mix together the pre-treatment ingredients. Pat dry the chicken wings with paper towels then coat each piece with the pre-treatment mixture, shake off excess coating. Lay them on a wire rack, uncovered, and air-dry for about 20 minutes.
  2. When you're ready to fry, set up your deep-fry thermometer, preheat oil to 350°F in a wok, sauce pan, cast iron pan or Dutch oven.
  3. While waiting for the oil to heat up, get the batter ready by mixing the dry ingredients first, then whisk in water and vodka.
  4. Coat 4-5 wings with the batter at a time. Using a pair of chopsticks, lift each piece one at a time and gently shake off excess batter. Carefully lower it into the oil. Fry each batch for about 6 minutes until golden brown. Use another clean pair of chopsticks to remove chicken from the hot oil, and set them on a paper towel-lined plate to cool off.

Notes:

Recipe adapted from SeriousEats.

Fried Shrimp Dumplings (炸蝦角)

There are three things I love and consider comfort food: noodles, dumplings, and wontons. Eat them separately? Eat them together? Egg noodle? Rice noodle? Pan-fried dumplings? Boiled dumplings? Soup dumplings? Eat them plain? Dip in soy sauce? Vinegar? Chili oil? I'm ALL IN. And most of the above is pretty easy to make at home. Then, it comes the fried dumplings that you may see at dim sum.

It's not that deep-frying is hard to do at home but it's just kind of a pain in the butt. Agree? But I decided to do it anyway because I was craving these little fried shrimp dumplings like there was no tomorrow. The trick in making restaurant-quality shrimp dishes is the shrimp. (DUH). Just what do Chinese restaurants do to make shrimp taste so good? The answer is in the texture which is written all over Chinese food. It's all about 口感 (mouth feel) - crunchy, soft, "springy" (彈牙), chewy, smooth, tender, etc... If you've had shrimp from a Chinese restaurant before, you'd notice that the shrimp tastes somehow "crunchier" in an interesting way. I was curious in just how such thing is accomplished so I started poking around for answers. Then, I stumbled upon a post written by Bee over at Rasa Malaysia. To sum up her research, treating shrimp and achieving a pH8 to pH9, which is considered alkaline, will make a crunchier texture. Cold tap water is usually alkaline with close to pH9. And that's why restaurants run cold water on shrimp. "Sea water is pH8 and the reason why live/raw shrimps have firm and crunchy flesh". Bee went further to test another method, that's used at some restaurants, of adding egg white (ph8), tapioca starch, and baking soda (ph8). It turned out to be a success, and it has been her go-to technique for preparing shrimp for stir-fries and whatnot. The only thing about this technique is that it requires 5-6 hours to marinate so plan ahead.

Gosh! Don't you love knowing food science? Or is it just me? Thanks Bee for sharing your findings.

Now, if you want the end product of the shrimp dish to have whole shrimps, then I'd suggest that you give Bee's technique a try. However, for these Fried Shrimp Dumplings (炸蝦角), I was looking for another texture that fried shrimp rolls (炸蝦卷) at dim sums offer. For that, it requires a shrimp paste that's commonly referred to as Ha Kaw (蝦膠) which describes a shrimp paste that's springy or stretchy. But what the heck? How do you do that? Just hold on a second and let me explain before you decide to bail on me! What you really need is to get your hands dirty by mixing the ingredients by hand. If you can do that, you can make Ha Kaw (蝦膠). Yea, sure. You may try using a hand/stand mixer instead but you'll miss out on the fun! Besides, your hands are mandatory in the last step so you might as well get them dirty now. After mixing the shrimp paste together (stirring in one direction continuously), form it into a ball shape. Take it with one hand, then smack it back into the bowl. Repeat that 10 times then it's ready to be used as filling.

For deep-frying, it's handy to have a cooking thermometer so you can keep track of the oil temperature. Something like this from Sur la Table would be ideal because it's got a clip that holds it securely to the pan during frying.

Like spring rolls at dim sum, these fried shrimp dumplings are commonly served with worcestershire sauce (but sometimes served with mayonnaise instead). It's definitely one of my favorite dim sum dishes of all time!

Fried Shrimp Dumplings

Prep time: 35 mins  Cook time: 20 mins  Total time: 55 mins

Serves: about 24

You'll need:

  • 1 lb medium raw shrimp, shelled and deveined
  • 2 egg whites
  • 2 tbsp olive oil
  • ½ tsp salt
  • ½ tsp white pepper powder
  • 1 tsp sesame oil
  • 30 round wonton wrappers
  • 2 cups vegetable oil for frying

Approach:

  1. After peeling and deveining the shrimp, raise it under cold water for a few minutes, then pat dry with paper towels.
  2. Using the blade of a chef knife, lay it flat and mash the shrimp one by one by putting force down. Then push it to the side of the chopping board. Once all the shrimp has been mashed, give it a few more chops to make sure the consistency is good. Place it all in a big mixing bowl.
  3. Add egg whites, olive oil, salt, white pepper powder, and sesame oil. Run your fingers clock or counter-clock wise until everything is well-blended together. Then form it into a ball shape. Take it with one hand, then smack it back into the bowl. Repeat that 10 times. Cover the mixing bowl with plastic wrap, refrigerate for one hour.
  4. Damp a paper towel and cover wonton wrappers when not in use, and place a small bowl of water at your work station.
  5. Spoon about 1 tbsp of filling onto the middle of the wonton wrapper. Dip your finger in water and run it on the outskirt of half of the wrapper. Pinch the middle point on top, and make pleats on both sides. The tighter you can wrap a dumpling the better.
  6. In a 5-6 quart sauce pan, heat vegetable oil to 350°F over medium-high heat. Carefully monitor your oil temperature. Fry no more than 4 dumplings at a time. Fry each side for about a minute and a half, until golden brown. Place cooked dumplings on a plate lined with paper towels.
  7. Serve fried shrimp dumplings with worcestershire or mayonnaise as dipping sauce.

Baked Buffalo Cauliflower

These buffalo cauliflower bites are so addicting! Okay, to be honest, I kinda have a love-hate relationship with cauliflower. It's just not a vegetable I grew up eating a whole lot. When I was a kid, my mom cooked more broccoli than cauliflower, and she'd always call them "tiny trees" :) Cauliflower always gives me an impression that it's a very bland vegetable, and I'd need a lot of seasoning when cooking it. But over the years, I've come to appreciate this white, soft, and comforting food.

Break (cut) them into small bite pieces.

Then coat each one with batter.

Line them on a baking sheet.

You'll basically bake these buffalo cauliflower bites twice – once to cook the breading, and once to add more flavor and color to them. It's really as simple as 123, eh?

Now, the next time you're needing to make a finger food that's healthy, tasty and flavorful, you know what to do ;)

Baked Buffalo Cauliflower

You'll need:

  • 1 head of cauliflower
  • 1½ cup flour
  • 1½ cup water
  • 4 tbsp of hot sauce
  • salt and pepper
  •  

Buffalo sauce:

  • 3 tbsp of hot sauce
  • 3 tbsp of olive oil
  • salt and pepper
  •  

Yogurt dipping sauce:

  • 4 oz plain Greek yogurt
  • ½ tbsp olive oil
  • ½ tsp Italian seasoning
  • *you may also use fresh dill/basi

Approach:

  1. Preheat oven to 450°F.
  2. Line baking sheet with parchment paper, and brush some olive oil on top lightly.
  3. Break cauliflower into small pieces (bite sizes).
  4. Mix batter by combining the flour, water, hot sauce, and salt and pepper.
  5. Mix the buffalo sauce by combining hot sauce, olive oil, salt and pepper, then set aside.
  6. Coat each piece of the cauliflower with batter, then lay them on the baking sheet and bake for about 15 mins.
  7. *Consider using chopsticks for coating and transferring from bowl to baking sheet.
  8. Let them cool for 5 minutes, then transfer them into a mixing bowl.
  9. Drizzle the buffalo sauce and toss lightly.
  10. Transfer them back on the baking sheet, and bake for an additional 5 minutes.
  11. For dipping sauce, combine all ingredients and mix well.